After much thought I have decided to move my blog. I am unsure of how to redirect this Blog to that site for the moment , so I figured I would add this notice. Please visit me in my new home at www.snapcolorpaste.com and tell me how you've been.
As always hoping you had a wonderful weekend.
Sunday, June 14, 2015
Tuesday, June 9, 2015
Just Coolin'
Good Morning,
This month’s stamp releases have been just too cute for
words and some of them were just begging to make the trip to my house. My Favorite Things has a set called Penguins
in Paradise and it is just adorable.
Today’s project uses one of the stamps from that set. This young man looks like he is ready for
riding the waves with his inner tube around his waist because Safety
First.

The waves were cut with my
Silhouette Cameo because I do not have a wave die. It is a shame to me that I have had this machine
for probably going on three years and very rarely use it in putting elements on
my cards. That needs to change, wouldn’t
you agree? The sun is a die set from
Simon Says Stamp called Sunshine and the little face on him is from this last
month’s Simon Says Card Kit called Happy & Smile. I sponged some distress ink over my waves to
give them a finished look and took my white enamel accents to add some froth to
the top of the roaring waves. The
starfish comes from Lawn Fawn’s So Jelly set and was cut out using his matching
die. When it was time to put the card
together I temporarily adhered my waves to the main panel and then die cut all
three pieces together so the stitch lines would match up. My first set of waves does not sit flush on
the panel so I used one of the dies from Lawn Fawn’s Stitched Borders just to
give it that bottom edge and it worked out pretty good. The penguin was colored using copic marker
and then I fussy cut him out. His inner
tube was looking a little blah to me, so I took some liquid pearls to add some
dots to his inner tube. When I came time to put this project together I used
some clear dimensional behind the sun, first wave, and penguin. All of the other elements are flat on the
card.
Here’s to having a great TuesdayJ
Supplies used:
Paper: Neenah Solar White #100, Hammermill #100 for focal
panel and elements, Recollections Blue and Yellow;
Stamps and Dies: My Favorite Things Penguins in Paradise,
Lawn Fawn So Jelly and matching die, Simon Says Stamp Sunshine die, Simon Says
Stamp Happy & Smile, Lawn Fawn Stitched Borders, My Favorite Things
Blueprint 25;
Inks: Distress Inks Spiced Marmalade, Tumbled Glass, and
Stormy Sky, Broken China, Stormy Sky, Ranger Black Archival, Memento Tuxedo
Black;
Copics: YR14, E93, R12, N1, N3, N5, N7, Y13, Y17, YR04, R29, R39, R59,
R00, C00, C1;
Everything else: Silhouette Wave
Borders cut file, Ranger White Enamel Accents, Sakura Black Glaze pen, White
Gelly roll pen
Sunday, June 7, 2015
Wish Big
Hello Everyone. Sorry
I have been MIA, but my husband has been making me get out of the house and
doing something other than sitting around obsessing over what my next project
should be. I will admit that I have not
learned to just go with it when creating projects. I overthink everything which causes me to
either not finish the project or not like it when it is done. I have to remember that there is no wrong
when creating and I should really enjoy the process of making the project.

This week’s project was created using a digital stamp from
Make it Crafty called Meadow Girls Wishful Aisha printed using my Epson
printer. I let it set overnight just to
try and avoid any smearing that may occur.
I will be honest though I have not run into a lot of that issue, Thank
Goodness. This lovely little girl was
colored using Copic markers and used sponged my distress inks to create the
background. I lined up my Bella letters
from Mama Elephant to create my sentiment.
Let me tell you, it was not an easy thing trying to get them lined up
and I am still not sure they were as straight as possible, but I stamped them
anyway using Ranger Black archival ink.
As I was looking at the project the sky seemed a little bare, so I
grabbed a stencil I had created using my silhouette that seemed to go along
with the little flower Aisha was holding.
I remember blowing on these little things as a kid and making wishes
upon wishes. I took my palette knife and
some pearl modeling cream and scraped it over the stencil. I made a mat for my project using a piece of
6 x 6 paper that I had. I am not sure
but I do believe it came in one of my Simon Says Stamp monthly kits, but don’t
quote me. I placed the whole panel on a
white card base and I consider it done.
I hope you have had a wonderful weekend and your upcoming
week is a peaceful oneJ
Supplies used:
Paper: Neenah Solar White #100, Hammermill #100 for focal
panel;
Stamps and Dies: Make it Crafty Digital Wishful Aisha, Mama
Elephant Bella Letters, Diezyne Stitched Rectangle, Mama Elephant Scripty
Hello;
Inks: Distress Inks Mowed Lawn, Cracked Pistachio, Tumbled
Glass, and Stormy Sky, Ranger Black Archival;
Copics: E000, E00, E11, E21, BV20, R20, B0000, B000, YG08, YG13, G14,
Y04, Y06, Y13, Y21, YR24, RV13, RV21, RV42, N1, N3, C1, W7;
Everything else: Viva Pearl
Modeling Cream, stencil created using Silhouette Cut File
Saturday, May 16, 2015
Have you ever seen an Elephant fly?
Growing up my mother had us in what she calls the fantasy
world. We saw as many of the Disney
movies as possible and she tried to shield us from all of the foolishness in
the world. Thanks MomJ Today I still prefer to retreat to that simple
world of Disney and that is where my inspiration for this week’s card comes from. We both love Dumbo and I’m almost certain we
both cry when the mother is rocking Dumbo in her trunk through the bars of her
cage.**sniff sniff** So when I saw that
WPlus9 was starting a sketch challenge where you had to use one of their
products I pulled out this little elephant.
Since his ears are pretty proportioned to his body I had to do the next
best thing of hooking two balloons to him to get him in the air and he’s flying
now. Dumbo would be proud. I am entering this card in the WPlus9 sketchchallenge and also this week’s color throwdown.
I hope you have a wonderful weekend.

Supplies used:
Paper: MasterTouch Watercolor Paper, Hammermill #100 for critters
and balloon, Recollections Black for sentiment and green for grass Lawn Fawn
Let’s Polka;
Stamps and Dies: WPlus9 Unforgettable and matching dies,
Lawn Fawns Gleeful Gardens and matching die, Lawn Fawn Grassy Border, Diezyne
Stitched Rectangle, Mama Elephant Scripty Hello;
Inks: Memento Tuxedo Black, London Blue Dylusions spray;
Copics: YR61, Y06, Y08, Y15, YR04, R89, R59, R37, R81;
Everything else: White Gelly
roll pen, Black Glaze pen, MME Red Enamel dots and Jubilee Sticker
Saturday, May 2, 2015
Dove's Lilacs
This week Sandy Allnock released a hexagon copic chart and I
just had to get my paws on it. I love
how her chart shows colors in a tonal group more so than color families and how
her hexagons are a little larger than the small squares on the copic chart. Thank you Ms. Allnock for making color selection a little easier for the rest of us. My card this week is will be submitted in this
week’s cue card challenge (flight) over at CASology. The stamp is a Jennifer Dove design available
at CC Designs and I will admit that when I first stamped this out I thought I
was going to get terribly lost in all of the petals, but I was able to keep my
head and I really like the way it came out in the end. Thank you Ms. Dove for all of the shading hints in the stamp. As always the Copics used are listed below
along with the other used items.

Supplies used:
Paper: Gina K Grass Green for base, Hammermill #100 for
picture panel, Recollections Black for frame Recollections yellow for sentiment;
Stamps and Dies: Lilac and Butterfly by Jennifer Dove, By
Diezyne Stitched Strips and Pierced Ticket;
Inks: Memento Tuxedo Black, Versafine Black, White Gelly
roll pen;
Copics: V04, V15, V17, YR15, YR17, Y38, YR09, YG06, YG07, and G14;
Everything else: Gold Viva Pearl
Pen, Recollections Clear Embossing Powder.
Wishing you a great weekend and thanks for spending some of
it with meJ.
Tuesday, April 28, 2015
Life is better at the beach
This week’s card tells where my mind is going. Sandy beaches and deep blue water. Can everyone say V A C A T I O N.? It will be a while before I actually take
mine, but talking to my older sister last night she told me that she booked
herself on a fourteen day cruise through the Mediterranean as a fiftieth
birthday gift to herself. I was so
excited for her and since I was already working on this airbrush technique
following the instructions from Jennifer Dove, I decided to turn it into a card
to wish her a great vacation.

The background was created using copic markers, an airbrush
system, and a little of the Copic Opaque white.
I used Lawn Fawn’s Life is good stamp set and matching dies. The sentiment is stamped using Versafine
black and the hearts from the Happy Trails stamp set also from Lawn Fawn is
stamped WPlus9’s Sweet Gelato.
Supplies used:
Paper: Neenah Solar White for card base, Hammermill #100 for
picture panel and die cuts, Recollections Black for mat Record;
Stamps and Dies: Lawn Fawns Life is Good with matching dies and
Happy Trails for the heart, By Diezyne Stitched and Pierced Rectangles;
Inks: Memento Tuxedo Black, Versafine Black, WPlus9 Sweet
Gelato, Copic Opaque White, Lavender Atyou Spica pen;
Copics: B99, E55, R29, R39, R59, Y13, Y15, YG07, YG09;
Everything else: Airbrush
compressor
Thanks for stopping by.
Sunday, April 19, 2015
Hello Again
Hello. I've been away
for a while, but I’m back. I decided to
try and get my crafty space in some sort of order and it took me a little
longer than what I anticipated. I am submitting this card for the Simon Says Stamp background challenge as well as retrosketches.


I stamped Owen from Whipper Snapper and placed him in the
center of my card stock panel using Memento Black and colored him with the Copics
listed below. I cut both him and the patterned
paper using the Stitched and Pierced rectangles from CC designs. I used my airbrush to create the skyline
using B01 and airbrushed the ground using one of the G markers, sorry I forgot
to write down that marker color. The
flowers are done using stamps from Lawn Fawn’s Hello Baby set stamped in
Beanstalk and Wild Mango with a small touch of bling in the center. I created the speech bubble by cutting a
small portion of scrap paper using the same size die as the image panel and
then placed the Lawn Fawn speech bubble die along the bottom to finish off that
element. The sentiment in the stamp
bubble is from a Simon Says Stamp set from the April 2015 card kit using WPlus9
Sweet Gelato. I placed the whole panel
on a card base created using Gina K dark chocolate cardstock.
Supplies used:
Paper: Gina K Dark Chocolate, Hammermill #100 for picture
panel, We R Memory Keeper For the Record;
Stamps and Dies: Whipper Snapper Owen, Simon Says Stamp
Flowers on my mind, Lawn Fawn Hello Baby, By Diezyne Stitched and Pierced
Rectangles, Lawn Fawn Speech Bubble Border;
Inks: Memento Tuxedo Black, WPlus9 Sweet Gelato, Beanstalk,
Wild Mango, Sakura Metallic Glaze, Metallic, and White Gelly roll pen;
Copics: B01, E50, E51, E53, E55, G20, G21, RV11, RV13, RV17, YR20,
YR21, YR23, Y15, Y17, YG23
Everything else: The Paper
Studio Gemstones
Thanks for stopping by.
Saturday, April 4, 2015
Sweet Hello
This weekend there is a challenge going on over at the
Passionate Paper Creation FB group to create a project using an image from
Sweet Pea Stamps? Since I am a hoarder
of all things crafty hence my blog name, I had a few digital images from the
site and chose this little lady to color up today. It’s funny I was sitting in my space all day
trying to figure out what to craft today and it was not until about six p.m.
that it finally came to me what to do. I
printed Connie Fong’s Little Blossom at a size of 3.5 inches and started
bringing her to life.

After she was all colored in I used some black liquid pearls
to the center of the flowers to add a little dimension. I added some red atyou spica pen the berries
on her bag and some clear spica pen to the strap around the same bag and along
her shoes. I die cut the image using a
By Diezyne stitched rectangle and used the next size up for the mat. Next, I used the largest die in that set to
cut out the DP and then die cut a neutral color piece of cardstock using the
larger frame from the Mama Elephant Sew Fancy set to mat the DP on. I also used the Mama Elephant hello die for
my sentiment. It is cut out three times,
once in the gold foil and the other two are in a neutral brown below it and
they are glued together using multi matte medium.
Supplies used:
Paper: Recollections various colors, Neenah #110 Solar White
for card base, Hammermill #100 for picture panel, DCWV Far East and Foiled
Cardstock;
Stamps and Dies: Connie Fong’s Little Blossom, MaMa Elephant
Hello and Sew Fancy, By Diezyne Stitched and Pierced Rectangles
Inks: Epson, atyou spica pens clear and garnett;
Copics: E000, E00, E21, W1, W3, W5, W7, BG23, BG34, BG32, BG15, R22,
R24, R14, R59, Y00, Y04, Y08, G40, G43, T3, T5, T7;
Everything else: Black Liquid Pearl
Thanks for stopping by and wishing wonderful Easter.
Saturday, March 28, 2015
Group Photo
When I saw this stamp set during preview week over at Mama
Elephant I knew that I had to have it.
This group of kids is just too cute and a good group to color up,
although time consuming.

As I said earlier, Mama Elephant’s Photo Bomb was used on
this card and colored up with Copic markers.
Once I finished coloring faces I got a little lazy and decided to paper
piece the two dresses worn with some Snap Vibe paper. I used a white sharpie pen to color in the
areas that could be taken for lace around their necklines and the sleeves on
the one in the lower left corner and put some Christmas red stickles to the
heart on her dress as well. One of my kiddos
got a little lost in the image, but he made it through. I cut two Polaroid frames out of neutral
colors and put my focal image into them and placed it on the red panel. I cut the letters out of scraps of
Recollections paper that I had in my stash and fixed them to my project using multi-matte
medium. I put a metallic enamel dot to
represent a magnet at the top of my Polaroid.
Supplies used:
Paper: American Crafts Red for main panel, Recollections
various colors, Neenah #110 Solar White for card base, Hammermill #100 for
picture panel, Snap Color Vibe 6 x 6 paper pack;
Stamps and Dies: MaMa Elephant Photo Bomb, Lawn Fawn Say
Cheese Die, Lawn Fawn Finley’s ABC’s, MFT Blueprint 18 for red panel;
Inks: Memento Tuxedo Black;
Copics: B00, B01, YG13, YG17, R17, R27, Y19, Y21, Y32, Y23, C5, C7, W5,
W7, E000, E00, E19, E11, E13, E17, E21, E23, E33, E35, E53, E55, R01;
Everything else: MME Metallic
Enamel Dots, Black Sakura Glaze Pen, Black Memento Marker, White Sharpie pen,
Thanks for stopping by and wishing you a wonderful day.
Sunday, March 22, 2015
Hello
Today is one of those lovely days that I should probably be
doing something other than sitting in the house, but sometimes a sketch just
calls to be done.

I used Stamping Bella’s uptown girl Charlotte loves to Shop
for my focal image. She is stamped using
Memento Tuxedo Black of course since I was going to color her using Copic
markers. Once she was colored up I cut
her out using Lifestyle Crafts rectangles and then used the next size up to
create the mat out of Gina K Ocean Mist cardstock. After my image was cut out I could now add
the little details to make her unique.
In her cup I used some white Liquid Applique to represent the whipped
cream we all love. Some glossy accents
were placed on her glasses to give them a little shine. I used the Sakura black glaze pen to deepen
her eyes, the blue one was used to fill in the circles on one of her shopping
bags; and a white gel pen was used to add bring out the stitching on her jeans.
The flags were created using paper from Lawn Fawn Beachside
pint-sized patterns. I used the Lawn Fawn
circle die to cut both the mat and sentiment circle. I placed some fun foam behind the whole panel
and then placed it all on my card base.
I'm entering this card in:

Supplies used:
Paper: Gina K Ocean Mist for mat, Hammermill #100 for focal
and sentiment panel, Neenah #110 Solar White for card base, Lawn Fawn Beachside
pint-sized patterns;
Stamps and Dies: Stamping Bella Uptown Charlotte loves to
Shop, Lawn Fawn Love ‘n Breakfast for sentiment, Lifestyle Crafts rectangle and
circle dies;
Inks: Memento Tuxedo Black;
Copics: E11, E33, E25, BV20, B34, B37, B39, C7, C9, BG34, BG45, BG49,
Y13, Y15, Y08, R81, R83, R85;
Everything else: White Liquid
Applique, White gel pen, Glossy Accents, and Sakura Black and Blue Glaze pens.
Thanks for stopping by and wishing you a wonderful day.
Saturday, March 21, 2015
Unforgettable
I back using that cutie from WPlus9.

I had to make another birthday card for my
nephew since my oldest son took the amazing distress card to give to his
girlfriend’s mother for her birthday. I think the next card he needs he will have to
make on his own (smile).
I cut my focal
panel using the die from Mama Elephant’s Sew Fancy die set. The die leaves a lovely x stitch all the way around
the panel. Next, I stamped my little
elephant using Tuxedo Black in what I believed to be close to the center of the
card. I also stamped him two more times
on some scrap Hammermill that I have so I could color one to place on this card
and have one to color later for another card.
I then stamped one balloon off to the left of him and before I stamped
the second I turned the string to make it look like the elephant was holding it
and removed some of the ink that was towards the end of the stamp.
I grabbed some green cardstock and using the Sew
fancy die I cut two pieces and then used Mama Elephants Landscape trio to cut
the hills. Now it was time to finally do
what I really enjoy, which is coloring.
I colored my elephant first on the scratch piece and die cut him out
using the coordinating die. I then colored my balloons and used a little clear
glaze for a highlight area on both of them.
I used a Hero Arts star stencil from the sky pair and sponged some wild
honey to add a little more interest around him without having to add
sequins.
I stamped my sentiment using Versafine
watermark and sprinkled Judikins white detailed embossing powder and set it in
place. All that was left after that was
mounting everything. The first hill is
flush with the card panel; the second hill is on with some of the harbor freight
double sided tape I mentioned last week.
I also used that same tape to put my elephant on so everything was the
same height. The party hat is stamped
using Mama Elephant’s Pacific Blue pigment ink and die cut with the
coordinating die when it was dry.
Supplies used:
Paper: Gina K Ocean Mist for base, Hammermill #100 for image
and focal panel, Recollections green for hillsides;
Stamps and Dies: WPlus9 Unforgettable, Mama Elephant Landscape
Trio and Sew Fancy;
Inks: Memento Tuxedo Black, Wild Honey Distress Ink, Mama
Elephant Pacific Blue pigment ink, and Versamark;
Copics: W00, W02, W04; RV13, RV17, RV79, BV04, BV08, BV17;
Everything else: Hero Arts Stencil
Pair Sky, Judikins Embossing Powder, Multi Matte Medium, HFT Mounting tape, and
Sakura Black and Clear Glaze pens.
Thanks for stopping by and wishing you a wonderful day.
Friday, March 20, 2015
Monkeying around
My card is made for the current “anything goes” linky party
going on over at Anya, Oddies, and Others. Lawn Fawn just did their spring
release in February, so you know I had to grab a few of the new goodies that
came out. The first one I am going to
focus on is the Critters in the Jungle set that you see here. I just fell in love with the monkey, so I
decided to make a little scene of him just hanging around.

For his background I wanted to do something other than
airbrush, trying to keep from falling in the trap of same old same. So, I decided to do some puddling using
Ranger’s alcohol inks (lemonade and sailboat blue). I put a few drops on my craft sheet, sprayed
it with some alcohol, and then pressed my piece of Ranger Specialty Paper (cut
at 4.25 x 5.50) in it and continued pressing it in until there was little white
space left.
While I let that dry I started working on my images by
stamping them with Memento Tuxedo Black and then coloring as listed below. When I stamped the vine the monkey is hanging
from I stamped it first the correct way and then again in the opposite
direction but touching to give the appearance of a single vine. When it came time to put the card together I
used the rectangle from the MFT Blueprint 18 for the background and to cut a
piece of green. The green piece was then
cut using the grassy borders die and different heights. I then cut all of my images out using their
coordinating dies to include the vine piece.
For the vine I had to do partial die cutting on both ends leaving a
small piece in the center uncut. The
uncut piece I cut by hand which ensured it was all one piece and no need for
glue to hold them together. The monkey
was cut using the die, but then I also cut the center area around his tail out,
so I could loop it around the vine. I then
put everything in place added some true blue stickles to my parrot and then put
the sentiment in the upper right corner.
REMEMBER it is anything goes this month at Anya, Oddies, and
Others, you have until April 20th to submit your project. That is four weeks to prepare your entry, so
we want to see what you create.
Supplies used:
Paper: Neenah #110 for base, Ranger Specialty paper for background,
Hammermill #100 for images, Recollections green for grass;
Stamps and Dies: My Favorite Things Blueprint 18, Lawn Fawn
Critters from the Past and matching die, Critters from the jungle and matching
die, script sayings, grassy border
Inks: Memento Tuxedo Black, Alcohol Inks Lemonade and
Aqua, Versafine Black;
Copics: Parrot: YR15, YR16, YR07; W3, W5, W7; and B12, B14, B16
Monkey: E51, E53,
E55; E23, E25, E27
Palm Tree, Loose
Leaves, and vine: E71, E74, E77; BG93, BG96, BG99
Everything else: True Blue
Stickles
Thanks for stopping by and wishing you a wonderful day.
Monday, March 16, 2015
Amazing Distress
I made this card for my nephew’s birthday coming in the next
week. The focal image is the elephant
from WPlus9’s Unforgettable set. I fell
in love with this little elephant after watching Sandy Allnock’s video titled Unforgettable Belated Birthday Card and WPlus9’s video titled StorybookWatercolor.
I stamped out my image on some Hammermill #100 cardstock
using Memento Tuxedo Black ink and then colored with the Copics listed
below. Then I cut out the image using
Lawn Fawns Stitched Journal die and to be honest I let it set for a couple of
days because I was not for sure where I wanted to go with the project.

Once I received my order from Joann’s yesterday I knew how
to finish it off. I used some of
distress stains that I received and did a watercolor background which I think
came out great. While that was drying I
used my Memento Pear Tart marker and made a line under my elephant to give him
someplace to sit and then I stamped one of the sentiments in set using
Versafine Onyx Black. I used some
glossy accents on my balloon and grabbed some doodlebug sequins and placed them
on my journal card.
Now that my watercolor panel was dry I die cut using the
Mama Elephant Peek a Frame die and then I placed it on my card base using some double
sided tape I picked up at Harbor Freight last week. This tape is not acid free or archival safe,
but it is so much thinner than the 3M tape and I wanted to give it a try.
I said it earlier but I really like the way this card came
together.
Supplies used:
Paper: Neenah #110 for base, MasterTouch Watercolor paper, and
Hammermill #100 for images;
Stamps and Dies: WPlus9 Unforgettable, Lawn Fawn Stitched
Journal Die, Mama Elephant Peek a Frame;
Inks: Memento Tuxedo Black, Gina K Blue Raspberry;
Distress Stains Salty Ocean, Spiced Marmalade, Squeezed Lemonade, and Mustard Seed;
Copics: W00, W02, W04; B00, B02, B04, R20; Y04, Y06, Y08; YG03, YG05,
YG07
Everything else: Glossy Accents,
Atyou Spica pen Lemon and Baby Blue
Thanks for stopping by and wishing you a wonderful day.
Saturday, March 14, 2015
Thoughts of you
Here’s a card I made last weekend using Lawn Fawn’s Critters
on the Savannah stamp set. When I
originally started this panel the tree as just supposed to be in the back of my
giraffe; however when I started making
my clouds I brought them down to far, so it was time to change the design and
make it seem as though the giraffe was dreaming about being back on the Savannah. I’ve put the fence in front to represent him
being in a zoo.

Supplies used:
Paper: Gina K Grass Green for base, Recollections yellow for
the mat and metallic for fence, Hammermill #100 for images;
Stamps and Dies: Lawn Fawn Critters on the Savannah and
Scripty Sayings, Lawn Fawn Picket Fence and Grassy Border
Inks: Memento Tuxedo Black, Gina K Blue Raspberry;
Everything else: Brown flocking
powder
Thanks for stopping by and wishing you a wonderful day.
Monday, March 9, 2015
Wet Wishes
Here’s a shaker card done using Simon Says Stamp Best Fishes
set. Over the weekend I saw a video by
JJ Bolton where she uses the We R Memory Keepers Fuse to make a shaker card and
that got me thinking if there was something in my house that I could use to
achieve the same result. I showed the
video to my husband and he told me what to use (a soldering iron). So, I found I low wattage one (40 to be
exact) and grabbed a 12 x 12 page protector. First I used it to get the hang of the iron
and then I used it again to make my shaker pocket. As you can see I probably used way too many
beads in the pouch; but hey, that’s how we learn.

I grabbed my card panel front and stuck it in my MISTI to
figure out where I wanted to stamp my sentiment.
After I stamped the sentiment I also used it to figure out where to
place my die. Once I taped the die in
place I ran through my trusty cuttlebug.
I then used the fishbowl die to cut a few more frames out of red
cardstock.
My fish were stamped on some Hammermill and colored using my
Copics. I added some texture with some
colorless blender and apiece out outgrown sock.
I put some wiggly eyes on each of them and then glued them to the inside
of my shaker bag. Once everything was in
bag my bag I sealed it up and attached it to the back of my front panel. I cut a small piece of designer paper to go
behind my bag to add a little more interest.
Once everything was put together I added some foam tape to the back of
it and placed it on an A2 size card base.
I’m pleased with how it came out, but note to self is to not
use as many beads for the next one.
Supplies used:
Paper: Gina K Blue Raspberry for base and Fishy Fiesta for
DP, Hammermill #100 for images;
Stamps and Dies: Simon Says Stamp Best Fishes and matching
die
Inks: Memento Tuxedo Black, Gina K Blue Raspberry;
Copics: G40, G43; BG11, BG13, BG15; YG21, YG23, YG25
Everything else: Sea Beads,
Green Doodlebug Sequins, wiggle eyes
Thanks for stopping by and wishing you a wonderful day.
Saturday, March 7, 2015
Birthday in a Box
It’s been two weeks since my last post and I have so missed
actually making a card. So, last night I
sat down and decided to make a Pop-up box card.
The instructions for the card were found on Splitcoast Stampers found
here ttp://www.splitcoaststampers.com/resources/tutorials/popupboxcard/. Being my normal nerdy self I of course did a
test run in white cardstock to ensure I understood the directions and it was a
lot easier then I thought it would be. The
instructions give you a completed project that fits in a 6”x 9” envelope. However, it does give instructions for
variations like mine which is for an A2 card.

I created the box using Gina K Sweet Mango cardstock
following the instructions in the tutorial and then it was time to decide on my
characters. So, I grabbed the Critters
on the Savannah by Lawn Fawn for my animals and a few extra elements from other
Lawn Fawn sets, stamped them all out with Memento Tuxedo Black and colored them
with Copic markers. Once all of the
images were colored I used the matching dies and cut them out. I then used Lawn Fawn’s grassy borders die
out of some green cardstock and cut them down to fit inside of the box. I had a banner already cut out from the
Stitched journaling die in white, so I smooshed some sweet mango on it to match
and also used the stars from the same set and cut them out in three different
colors for some extra oomph. Once my
banner dried I used the White pigment ink and stamped happy birthday using the
sentiment from the beep boop set and then brushed some gold perfect pearls over
it. I am not too sure about perfect
pearls but I am sure as with everything the more I use it I will come to love
it. My banner was adhered using score
tape and the stars with multi matte medium.
Supplies used:
Paper: Gina K Sweet Mango for base, Hammermill #100 for
images, Recollections green for grass, Purple, Orange, and Blue for Stars, and
Hampton Art Ki Celebrate for DP;
Stamps and Dies: Lawn Fawn Critters in the Jungle and
matching die, Critters on the Savannah and matching die, Beep Boop Birthday,
grassy border, Stitched Journaling Die
Inks: Memento Tuxedo Black, Gina K Sweet Mango, Hero Arts
White Unicorn;
Copics: Lion: YR21, YR23, YR24, E17, E18, E19, W5, W7, W9;
Giraffe: Y08, Y17,
Y19, E23, E25, E27, W5, W7, W9
Grass: YG95, YG97, YG99
Extras: Wiggly Eyes and Perfect Pearls Gold
Thanks for stopping by and wishing you a great weekend.
Friday, February 20, 2015
Dino-Mite
Today’s card was made for the current “anything goes” linky
party going on over at Anya, Oddies, and Others. This crafty group has allowed
me to join their design team, so this is my first card and I hope you will come
by upload your challenge creations.

The panel front on this card was made using the die from
MFT-Blueprints 18. Once that was done it
was time to stamp and mask. I’ll admit I
did a mock up last night so I could wrap my head around what I wanted to
do. After everything was masked off I
pulled out my air compressor and airbrushed my sky and ground. I unmasked my images and colored them up. On a piece of scrap paper I stamped the baby
dinosaur, colored him up and then used the matching dies to cut him out. Before I placed him on the panel I put some brown
flocking powder in the center of my leaves to mimic dirt in the nest and put
the baby on top. I then stamped my
sentiment using my just delivered MISTI tool and I can see that I will be using
it a lot. The completed panel was put on
an A2 card front created out of Gina K Grass Green cardstock.
Supplies used:
Paper: Gina K Grass Green Cardstock, Hammermill #100 for
focal image;
Stamps and Dies: My Favorite Things Blueprint 18, Lawn Fawn
Critters from the Past and matching die
Inks: Memento Tuxedo Black, Bamboo Leaves and Cottage Ivy,
Versafine Black;
Copics: Sky: Y15, YR18 Ground: YG93, YG95
Tree: E44,E47,E49
and YG23, YG25, YG17
Large Dinosaur:
V20, V22, V25, V17
Egg and baby: E41,
E43, RV10, RV06, RV04, RV02
Thanks for stopping by and I hope you have a great weekend.
Thursday, February 19, 2015
Owl days are the best
Today’s card was made for submission to this week’s Freshly
Made Sketch and The Paper Players Challenge of featuring one of our feathered
friends on it.
The card is on a top fold
A2. It is pretty much a one layer except
for the owl who is raised up on the clear ½” pop-dots. I stamped his hat on a piece of the same patterned
paper used on the stripe and pieced it on top of the base. I added some hot pink flocking powder because
every birthday hat must have some fluffy.
The owl was colored up using the Copics listed below and then my
colorless blender was used to make some small dots for texture on him. Once he was all colored up I originally
colored his eyes in black, but they looked a little flat. I then remembered I had some wiggly eyes in
my stash so I found some that would complement his colors and glued them in
place using some multi-medium matte.

Next I cut my DP stripe and the mat. Now, I don’t know about you but I am terrible
about gauging how much paper I will need.
To make sure I only had to cut my DP once I grabbed some scrap paper and
played with it to make sure I had the correct measurements for my DP. When I had the correct size it was glued to the mat and the finished piece was glued to the card front and I put the finished owl in place. With everything in place it looked a little
plain, so I grabbed my trusty Copics, colored up some Hammermill then used Mama
Elephant’s Confetti Cuts die. Once I had
enough die cuts I placed them around the card and used Lawn Fawn’s Birthday
tags to stamp a little using Mama Elephant’s pigment ink.
Challenges Entered:


Supplies used:
Paper: #110 Neenah Solar White for base, Hammermill #100 for
focal image, Recollections Black and Hampton Art Color Crush;
Stamps and Dies: Some Odd Girl Happy Owl Days, Lawn Fawn
Birthday Tags, Mama Elephant Confetti;
Inks: Memento Tuxedo Black, Versafine Black, Mama Elephant
Tutti Frutti and Eggplant;
Copics: Owl: E50, E51, and E53
G12, G24, G43
RV04, RV14, RV34
Thanks for stopping by and I hope your week is going well.
Monday, February 16, 2015
My Mother, My Hero
My mother turns 67 this coming Saturday, so I made her this
card to tell her just how special she is to me.
She has always been there for me even when I was dead wrong she stood by
me. The only condition to that was I
could not end up in jail. If that
happened I was on my own, needless to say I made sure that is not where I ended
up. When I had to deploy for military
assignments she took care of my oldest son for months at a time. She has had health struggles for the last
couple of years and no matter what I know that she is okay if she is cracking
jokes, so that is how I gauge her health is by her being able to laugh.
I’m sure I pulled
some design elements off of the Mama Elephant’s design team blog
unintentionally, so I apologize in advance if I have.


The front panel was done by placing a circle die in the
approximate center and cutting. Then I
placed the cityscape die cuts where I wanted them and cut off any that was
hanging from the sides. I cut a piece of
fun foam slightly smaller and used the next size up circle die to add some
dimension to that panel. For the sky I
used an A2 size panel and airbrushed it first with B32, then took B39 starting
at the edges working my way in so that I would have some darkness within my
circle area.
I next took my two superhero’s and pierced a small hole on
each and ran some gold thread that I have because we cannot have our pets out
sans leash, even if they are a super hero.
I figured out where they would be placed and then took my white gel pen
and made some stars in my sky. I put all
of my pieces together and dreaded having the front panel all white, so I
colored up some scrap paper using the same colors in the project and cut some
stars using the Mama Elephant Lots of Stars die and placed them throughout the
front panel and skyline. You cannot see in the picture but I added some clear
Wink of Stella pen to the stars before I topped them with glossy accents.
Supplies used:
Paper: #110 Neenah Solar White for base, Recollections Black
and gray for buildings;
Stamps and Dies: Mama Elephant Tiny Hero with matching dies;
Mama Elephant Cityscape and Lots of Stars; Lifestyle Crafts Nesting Circles
Inks: Memento Tuxedo Black, Versafine Black and Archival Red
Geranium;
Copics: Skin: E11, E15 Sky: B32,
B39
Hair: W1, W3, W5, S7
Outfit:
Y11, Y13
YG11, YG13
RV14, RV17
Thanks for stopping by and I hope you have a great Monday.
Sunday, February 15, 2015
So Grateful
This weekend I have been making Thank you cards for my
co-workers. Thursday was my last day at
my job and in a little more than a week I will be starting a new position. I had actually started making the cards a few
months ago when I had originally accepted the new job (back in October), but it
was taking so long to get through the background check that I stopped. So the Friday before last I finally got a call that I
could transfer to the new position and then it was a mad rush to finish up the
last of the Thank you’s. I will admit
two of them ended up being store bought.
I am going to share one of the cards made using the brayering
technique. I have such a hard time
finding images to use for male cards, but this one worked really well.

Supplies used:
Paper: #110 Neenah Solar White for base, Recollections Black
for mat, Ranger specialty paper;
Stamps: Technique Tuesday Appreciated
Inks: Gina K Sweet Corn, Grass Green, and Versafine for
sentiment
American Crafts Twine
Thanks for stopping by and I hope your weekend is going
well.
Thursday, February 12, 2015
Come On Spring
Hello Thursday and we are one step closer to Friday. How has your week been going so far? Are you ready for the weather to change? I am sure residents on the East Coast are
since some of them have been getting more than their normal share of snow this
season. Living out here in Texas it may
snow one day a year and the cold doesn’t sting as much as on the East Coast.
Today my card is a greeting to the season that we are all
waiting for “SPRING”. I used the sketch
for this week’s Freshly Made Sketch Challenge#173 and the color palette from
this week’s color throwdown #329. Don’t
you just love those colors?


Since I knew my duck was going to be colored in shades of yellow
I stamped him with Memento Dandelion ink so I could work on my no line coloring
and I placed my umbrella in a way to make it appear as though my duck is
carrying it using Tuxedo Black. After he
was colored up I cut him out using partial die-cutting so I could keep him and
the umbrella as one piece. When I
finished I was left with small sections of where the die did not cut and I
finished it using my detail scissors. I
stamped the top portion of the umbrella on the red pattern paper and pieced it
on top of the original cut.

Next, it was time to create the tag background. Using my airbrush system I created the grass
by airbrushing green copic marker over a stencil I cut using my Silhouette Cameo. Once I was satisfied with that it was on to
the sky. For the sky I used the airbrush
again and followed the Sea and Sky tutorial that Jennifer Dove provided on her site a few
weeks ago. During assembly of the tag I
noticed a small flower stamp, so I decided to place a few on my tag to pull it
all together, in addition to placing some foam adhesive on my duck and umbrella
to raise him from the background.
Supplies used:
Paper: #110 Neenah Solar White for base and focal tag, Recollections
Black, Citrus Green, and Purple Passion, Simple Stories Sn@p Color Vibe for DP;
Stamps: Lawn Fawn Hello Baby and Inky Antics Tulip Duck for
the word spring;
Dies: Little B Tags;
Embossing Folder: Lifestyle Crafts Linear;
Inks: Memento Tuxedo Black, Dandelion, and Grape Jelly
Ribbon: The Paper Studio
Thanks for stopping by and I hope your week is going well.
Tuesday, February 10, 2015
Happy Birthday!!
I’m back. Last week I
was able to travel to Phoenix, AZ to participate in the Copic Certification
classes taught by Ms. Debbie Olson. Wow,
so much knowledge and such a wonderful person.
While I have been learning on-line through Kit and Clowder,
It was nice
to sit face to face with someone and find out if what you are doing is
right. Enough about that, I am sharing a
card that I created for a co-workers birthday this week using the newly gained
skills acquired over the weekend. The
image is a digital one from Saturated Canary called Ana who was colored using
Copic markers. I started trying to use
this image for the Mojo Monday Challenge but I just could not make it work. However, I do like the finished product.
Supplies used:
Paper: #110 Neenah Solar White for base, and Recollections Jewel
Red, Feathered Greens, and Purple Passion;
Stamps: Saturated Canary Ana;
Dies: Lifestyle Crafts Rectangle, Simon Says Stamp Balloons,
and Mama Elephant Sew Fancy;
Thanks for stopping by and I hope your week is going well.
Sunday, February 1, 2015
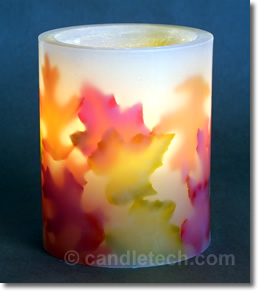
Falling Leaves
How has your weekend been going so far? Today is the Super Bowl here in the states and that means I will have my crafting space entirely to myself since all the men folk in my house will be watching the game. I treasure the time I am allowed in here alone since I share the space with my husband who is an avid computer gamer and my youngest fur baby who is a dog but gets in the window like a cat.
Yesterday on SCS the inspiration challenge was to review a Pintrest board and design a card inspired by it. This board had some amazing items pinned on it and this is the one I chose:
 and here is the card that resulted:

It is a very clean and simple one. In fact it is too clean for my husband who does not care for all of the white space. I found a scrap piece of #80 Neenah Solar White and placed some double sided adhesive on the back, swiped it with the three ink colors, and heat embossed it with clear embossing powder. Once the piece cooled I cut the sentiment out, peeled the backing off to reveal the adhesive and then placed it on my panel.
Yesterday on SCS the inspiration challenge was to review a Pintrest board and design a card inspired by it. This board had some amazing items pinned on it and this is the one I chose:
Supplies used:
Paper: #110 Neenah Solar White for base, #80 Neenah Solar White for focal panel;
Stamps: Penny Black Fancy Foliage;
Dies: Penny Black Wishes
Inks: Mama Elephant Lollipop, Lemongrass, and Orangeade;
Saturday, January 31, 2015
Day 5- 2 for 1
On day 5 of class there were two projects shown that I was
able to complete without making to horrible a mess. The first one is the circle card. My first time making one of these and it will
not be my last. The blue panels that you
see on the card were created by smooshing Memento’s Bahama Blue into the paper
to get a good coverage and the orange heart uses Memento Tangelo. The ring and center circles are popped up on
foam tape and I used a white gelly roll pin for my white stitch lines around it
mainly to cover a penciled circle that I couldn't remove entirely.

Supplies used:
Paper: #110 Neenah Solar White
Stamps: Mama Elephant Boutique Borders, Simon Says Stamp
Winter Wishes;
Dies: Lifestyle Crafts Nesting Circles, Lawn Fawn stitched
journaling card
Inks: Memento Bahama Blue, London Fog, Lady Bug, and Tangelo

The second card uses a technique called Ink Patterns. I placed some post-it correction tape on a
blank white panel in a design of my choosing and burnished the tape in good to
make sure it did not move during the inking process. I blended my chosen distress inks until I was
satisfied and then removed the correction tape and magic. It looked pretty cool, but I could see where
my tape did not match up exactly, so large stamp to the rescue. I then die cut, placed a red mat behind it
and popped it on some foam tape.
Supplies used:
Paper: #110 Neenah Solar White for base, #80 Neenah Solar
White for focal, Gina K Red hot for Mat
Stamps: Tim Holtz Good Thoughts
Dies: Mama Elephant Peek A Frame
Distress Inks: Mustard Seed, Pickled Raspberry and Barn Door
Thanks for stopping by and I hope your weekend is going
well.
Friday, January 30, 2015
Day 4- Faux Embossing
Happy Friday! We have
made it through the first month of the New Year.
Earlier in the week I shared that I was participating in
Clean and Simple 4 Techniques made Simple being presented on Online Card
Classes. Over the next couple of days I
am going to share some cards showcasing some of the techniques learned. I will admit there are some techniques I need
to conduct some remedial training on, but there are some that I think I have
got down pretty good. All that being
said here is the first card I am pretty giddy over. The trick to this card is that your die cuts
and panel must match in color. I
attached some double sided adhesive to the back of my cardstock and used Lawn
Fawn’s Thanks die until I had enough
cuts to cover my panel. Next, I took the
cuts and placed them on the card to see how I wanted them arranged. Once satisfied, I peeled the backing off of
my cuts and placed them on my panel. A
sentiment banner was heat embossed and put in place, and then the entire panel
was popped on a white card base.

Supplies used:
Paper: #110 Neenah Solar White for base, Gina K Ocean Mist
and Sweet Mango
Stamps: Mama Elephant Many Thanks;
Dies: Lawn Fawn scripty thanks, Lifestyle Crafts Rectangle
Thanks for stopping by and I hope your weekend is a crafty
one.
Wednesday, January 28, 2015
Caught A Bug?
Good Morning and Happy Hump Day!
This morning I was able to kick out a little get well card.
This card is a 4 bar size (3.5 x 5), so it is
slightly smaller than the common A2 (4.25 x 5.5). I stamped my background using matching inks
to create a tone on tone look. The
tissue box was created by paper piecing with some wiggle eyes added for character and the sentiment is heat embossed with white Judikins embossing powder for the final touch.


Supplies used:
Paper: #110 Neenah Solar White for base, and Recollections
Citrus Blend and Purple Passion;
Stamps: Lawn Fawn On the Mend;
Dies: Lawn Fawn on the Mend, Simon Says Stamp A2 Card Curved
Edge, Lawn Fawn Stitched Journaling Card
Inks: Memento Tuxedo
Black, Grape Jelly, Pear Tart, and Versamark
Embellishments: Wiggle eyes
Thanks for stopping by.
Tuesday, January 27, 2015
Wee One
Tonight’s card is inspired by the very talented Kristina
Werner. This week she is one of the instructor’s
presenting during Online Card Classes Clean
and Simple 4 Techniques Made Simple.
She calls this technique Border Gap die-cutting. I took her inspiration card and shopped my
stash and this is what I came up with. I chose the yellow and green as a way of being gender specific instead of the typical blue or pink.

Supplies used:
Paper: #110 Neenah Solar White for base, and #80 Neenah for
focal panel;
Stamps: Mama Elephant’s Carnival Cupcakes, Just Hatched, and
Happy Everything;
Dies: Mama Elephant Landscape Trio
Distress Inks:
Mustard Seed, Crushed Olive, Shabby Shutters, and Mowed Lawn
Distress Markers: Antique Linen, Worn Lipstick, and Pumice
Stone
Embellishments: Doodlebug Sequins
Thanks for stopping by and I hope your week is going well.
Monday, January 26, 2015
Hello Friend
Today I made this card using the Lawn Fawn set Feathered Friends that was created
especially for Simon Says Stamp Stamptember celebration last year. I stamped the tree limb using Memento’s Rich
Cocoa and colored with E55, E57, and E59.
Next, I stamped the leaves using Memento’s Cottage Ivy and colored with
YG23, YG25, and YG17. The birds were
stamped using Tuxedo Black by Memento and then colored using R35, R29, R37, and
BG45, BG15, and BG49 respectively. Next
I took some B00 various ink and placed it on a small acrylic block, mixed some
colorless blender in it and then took a small brush to put some color around
the edges of the image to break up all of the remaining white. The birds were die-cut using a Spellbinders small
circle and the mat was cut using a Spellbinders large die. The black panel and designer papers were cut
using the Mama Elephant Stitched rectangle from the Peek a frame set. The script die cut is from Simon Says stamp
and was cut from Hammermill cardstock that was colored using the same red copic
markers as the bird and then stacked on three additional cuts of the sentiment
in black. The word friend is from the
same stamp set and is heat set using white Judikins embossing powder. The final touches were a few sequins from the
Let’s Polka pack by Lawn Fawn.

I am entering this card in The Paper Players SketchChallenge #229.

Subscribe to:
Posts (Atom)